There are so many "egg"ceptional ideas in bloggyville-
The Easter crafts have been so creative-
I bought a cheap bag of plastic eggs with no ideas-

so far, this is what it looks like-


Next, the spray paint all over the eggs and puff paint
Trying to eliminate the pastels-
going with a tone on tone look!


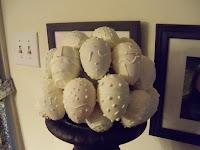

A styrofoam ball became the base and I started to glue

So far, so good!
Now, to fill in the empty spots
where the ugly syrofoam peaks through-


I love it-
The monochromatic coloration is exactly what I was looking for-lol
 So...
So...
What do you think?
Was it worth the # of steps?
My only problem was the spray paint-
I didn't use my old standby Krylon or even Rustoleum
I used Design Master Vanilla-only for the perfect cream color
but it's mainly used for dry florals- silly me-
what was I thinking (the problem-I wasn't thinking!!)
It had a hard time staying on the plastic eggs-
Krylon, for plastic, in white,
would have made it much simpler therefore, quicker!
Well, take care


Now, to fill in the empty spots
where the ugly syrofoam peaks through-

instead of the usual filler I use-
I spyed some shredded paper used in gift baskets and bags
It was cream colored so it coordinated well with the eggs!
Here is the final product-
I love it-
The monochromatic coloration is exactly what I was looking for-lol
sounds like I'm creating a richly enveloped room
with the same colors but different textures-haha
It's plastic eggs-people!!!!!!!!

What do you think?
Was it worth the # of steps?
My only problem was the spray paint-
I didn't use my old standby Krylon or even Rustoleum
I used Design Master Vanilla-only for the perfect cream color
but it's mainly used for dry florals- silly me-
what was I thinking (the problem-I wasn't thinking!!)
It had a hard time staying on the plastic eggs-
Krylon, for plastic, in white,
would have made it much simpler therefore, quicker!
Well, take care
Gotta fly- Claire
linking up to


I love it! looks amazing! I was just thinking of decoupaging some pretty paper to my plastic easter eggs but I love the look of these:) Thanks for the tutorial!
ReplyDeleteDraga moja ovo je baš lijepo,prekrasan stolni aražman za Uskrs.
ReplyDeleteClaire, What a fun idea. I once used a Martha Stuart idea, and made these beautiful Easter eggs. I staged them with cute props and took some fun photos. After the holiday and eggs were long gone. I finally finished the roll of film and had it processed. When I picked up the photos I had forgotten that I had put black and white film in the camera, so my beautiful bright eggs came out to be a mixture of gray, as did the rest of my Easter pictures. Thank God for digital.
ReplyDeleteGREAT idea!! I love the textured detail, but simplicity of one color! Great job!!
ReplyDelete:D Lynda
That looks great, and beautiful too. What a great idea. I am following you through the hop. http://thecryptocapersseries.blogspot.com
ReplyDeletewww.reneeahand.com
Thanks
Renee
I like it! Really they look great!!!
ReplyDeletenancy
What a great idea Claire! "Do I have the time to make one before Easter?" Hmm? I am now your newest follower. I'm looking forward to seeing what you'll be up to next.
ReplyDeleteBlessings from The OC,
Irma
very cute! glad i found a fellow creative mind on this weekend's hop :)
ReplyDeletewww.dr-momma.blogspot.com
I love it. It looks great and seems simple enough to make!
ReplyDeleteThanks for sharing!
Following you now :)
Hope you can stop by too http://willcookforsmiles.blogspot.com/
I've seen the eggs but what you did takes it to a whole other level! What a pretty arrangement! I'm doing a monochromatic look in my living/dining room so I need to bookmark this for next year! Thanks!
ReplyDeleteTHIS is gorgeous!!! Simply beautiful :) I will definitely have to try this out!
ReplyDeleteSo pretty! Totally worth it! And I love the early step with the colorful eggs n' puff paint, too.
ReplyDeleteI love all the cute dots...a very neat texture. :) I think your project turned out very cute!
ReplyDeleteThanks so much for joining my Weekend Bloggy Reading party. Hope you'll stop Serenity Now again soon. :)
How cute that is! Love the texture that the puffy dots, etc. add to the eggs. Thank you for linking to Favorite Things. laurie
ReplyDeleteOh that looks fantastic! Just that bit 'different' too which makes it all the more appealing!
ReplyDeleteThanks for linking to a Round Tuit!
Hope you have a great week!
Jill @ Creating my way to Success
http://www.jembellish.blogspot.com/
How adorable!!!! A very creative idea! :)
ReplyDeleteAdorable!
ReplyDeleteThanks for linking up to Smile With Me Saturday!
http://alittlenosh.blogspot.com
Hi Claire - Love the designs you have added to the eggs - very cute! I have featured these today. Thanks so much for stopping by and linking up to the Sunday Showcase - I greatly appreciate it. Hope you have a wonderful holiday! ~ Stephanie Lynn
ReplyDeleteThe eggs are textured and so oh pretty! Thank you so much for sharing this with us at the Creative Bloggers' Party & Hop :)
ReplyDeleteGood idea and neat results. Enjoyed the humor too! I'm here by way of Brambleberry's Time Travel Thurs. Thanks, Jenn
ReplyDeleteThat is a really cute project. It turned out great. Thanks for linking it up and would you please put a link back to the HSH party in this post. And, have a lovely Easter!
ReplyDeleteSherry
Super cool and cute! I love it.
ReplyDeleteLove it!
ReplyDeleteThank you so much for linking up to {nifty thrifty sunday} and making my first party such a great success! I would love if you stopped by tomorrow and share more of your cute projects! :)
xoxo,
Vanessa @ {nifty thrifty things}
Claire, I love this idea...so creative! Thanks for joining my Open House party.
ReplyDeleteHugs,
Sherry